 Message
 Contact
 Chinese

News Center
Exciting information for you

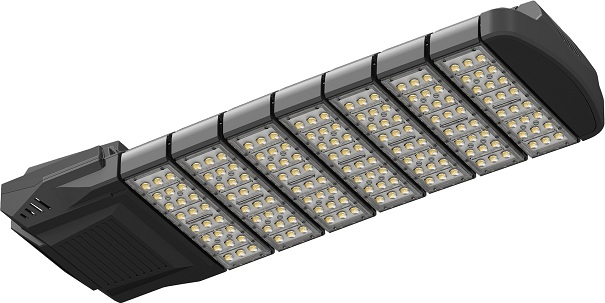
LED bracket light: the specific steps of installation, and the reason why it keeps flashing after opening!
- Categories:Company News
- Author:
- Origin:
- Time of issue:2020-09-10 19:00
- Views:
(Summary description) LED bracket lights are widely used in our lives. Before using it, we must first understand its installation steps. We need to prepare according to pre-construction, cable laying, power distribution box that needs to be opened, threading, grounding, inspection, and System debugging these steps to install. In the article, the editor not only introduces its installation steps, but also introduces the specific reasons why the LED bracket light keeps flashing after it is turned on. Interested friends can take a look! The specific steps of LED bracket light installation: 1. Preparation before construction Do a good job in technical disclosure, understand the drawings and understand the design intentions, and cooperate with other professional work, and do a good job in product protection and professional coordination. 2. Cable laying The electrical performance test should be carried out before, and the construction can only be carried out after passing the test. Cable laying should be arranged in a reasonable order according to its direction and specifications, and generally there should be no crossing. 3. Distribution box that needs to be opened Holes must be opened with a hole punching machine, and cutting holes such as gas welding is strictly prohibited. There should be protective caps when the wires enter the distribution box and junction box, and measures should be taken to prevent foreign objects from falling into them before threading. 4. Threading The wires are not allowed to have joints and windings in the pipe or through the groove. The outlet should be equipped with a grommet and tested with the relevant voltage. The insulation resistance should also meet the specified value, and make a record at the same time. 5. Ground There are distribution box grounding and protective grounding of each system. The working grounding should be connected to the original grounding grid to improve the entire grounding system. 6. Check After the installation is completed, check and confirm that it is correct before entering the sub-item debugging and making a debugging record. 7. System debugging After the sub-item debugging is completed, carry out system debugging, linkage debugging and trial operation and make records. The installation of other parts of electrical equipment should be carried out strictly according to the drawings. Reasons why the LED stand light keeps flashing after it is turned on: 1. The lamp beads of the LED bracket lamp do not match the LED driving power supply. The normal current of a single 1W lamp bead is 280-300 mA, and the voltage is 3.0-3.4 volts. If the lamp bead chip is not of sufficient power, it will cause light The light source is flickering. If the current is too high, the lamp beads will turn on and off. In serious cases, the gold wire or copper wire built into the lamp bead will be blown, causing the lamp bead to not light up. 2. It may be that the driving power supply is broken, as long as you replace it with another good driving power supply, it will stop flashing. 3. If the driver has an over-temperature protection function, and the heat dissipation performance of the material of the lamp cannot meet the requirements, the over-temperature protection of the driver will start to work, and the phenomenon will flash and disappear. This will happen if the cooling work is not done well. 4. If the outdoor lamps also flicker on and off, it means that the lamps have entered the water. The result is that it flashes and does not light up. The lamp bead and the driver are broken. If the driver is waterproof, just break the lamp bead and replace the light source. The above is the specific steps for the installation of the LED bracket light introduced by Xiaobian, and the reason why it keeps flashing after it is turned on. If you have any doubts, please feel free to contact us in time!
LED bracket light: the specific steps of installation, and the reason why it keeps flashing after opening!
(Summary description) LED bracket lights are widely used in our lives. Before using it, we must first understand its installation steps. We need to prepare according to pre-construction, cable laying, power distribution box that needs to be opened, threading, grounding, inspection, and System debugging these steps to install. In the article, the editor not only introduces its installation steps, but also introduces the specific reasons why the LED bracket light keeps flashing after it is turned on. Interested friends can take a look!
The specific steps of LED bracket light installation:
1. Preparation before construction
Do a good job in technical disclosure, understand the drawings and understand the design intentions, and cooperate with other professional work, and do a good job in product protection and professional coordination.
2. Cable laying
The electrical performance test should be carried out before, and the construction can only be carried out after passing the test. Cable laying should be arranged in a reasonable order according to its direction and specifications, and generally there should be no crossing.
3. Distribution box that needs to be opened
Holes must be opened with a hole punching machine, and cutting holes such as gas welding is strictly prohibited. There should be protective caps when the wires enter the distribution box and junction box, and measures should be taken to prevent foreign objects from falling into them before threading.
4. Threading
The wires are not allowed to have joints and windings in the pipe or through the groove. The outlet should be equipped with a grommet and tested with the relevant voltage. The insulation resistance should also meet the specified value, and make a record at the same time.
5. Ground
There are distribution box grounding and protective grounding of each system. The working grounding should be connected to the original grounding grid to improve the entire grounding system.
6. Check
After the installation is completed, check and confirm that it is correct before entering the sub-item debugging and making a debugging record.
7. System debugging
After the sub-item debugging is completed, carry out system debugging, linkage debugging and trial operation and make records. The installation of other parts of electrical equipment should be carried out strictly according to the drawings.
Reasons why the LED stand light keeps flashing after it is turned on:
1. The lamp beads of the LED bracket lamp do not match the LED driving power supply. The normal current of a single 1W lamp bead is 280-300 mA, and the voltage is 3.0-3.4 volts. If the lamp bead chip is not of sufficient power, it will cause light The light source is flickering. If the current is too high, the lamp beads will turn on and off. In serious cases, the gold wire or copper wire built into the lamp bead will be blown, causing the lamp bead to not light up.
2. It may be that the driving power supply is broken, as long as you replace it with another good driving power supply, it will stop flashing.
3. If the driver has an over-temperature protection function, and the heat dissipation performance of the material of the lamp cannot meet the requirements, the over-temperature protection of the driver will start to work, and the phenomenon will flash and disappear. This will happen if the cooling work is not done well.
4. If the outdoor lamps also flicker on and off, it means that the lamps have entered the water. The result is that it flashes and does not light up. The lamp bead and the driver are broken. If the driver is waterproof, just break the lamp bead and replace the light source.
The above is the specific steps for the installation of the LED bracket light introduced by Xiaobian, and the reason why it keeps flashing after it is turned on. If you have any doubts, please feel free to contact us in time!
- Categories:Company News
- Author:
- Origin:
- Time of issue:2020-09-10 19:00
- Views:
LED bracket lights are widely used in our lives. Before using it, we must first understand its installation steps. We need to prepare according to pre-construction, cable laying, power distribution box that needs to be opened, threading, grounding, inspection, and System debugging these steps to install. In the article, the editor not only introduces its installation steps, but also introduces the specific reasons why the LED bracket light keeps flashing after it is turned on. Interested friends can take a look!
The specific steps of LED bracket light installation:
1. Preparation before construction
Do a good job in technical disclosure, understand the drawings and understand the design intentions, and cooperate with other professional work, and do a good job in product protection and professional coordination.
2. Cable laying
The electrical performance test should be carried out before, and the construction can only be carried out after passing the test. Cable laying should be arranged in a reasonable order according to its direction and specifications, and generally there should be no crossing.
3. Distribution box that needs to be opened
Holes must be opened with a hole punching machine, and cutting holes such as gas welding is strictly prohibited. There should be protective caps when the wires enter the distribution box and junction box, and measures should be taken to prevent foreign objects from falling into them before threading.
4. Threading
The wires are not allowed to have joints and windings in the pipe or through the groove. The outlet should be equipped with a grommet and tested with the relevant voltage. The insulation resistance should also meet the specified value, and make a record at the same time.
5. Ground
There are distribution box grounding and protective grounding of each system. The working grounding should be connected to the original grounding grid to improve the entire grounding system.
6. Check
After the installation is completed, check and confirm that it is correct before entering the sub-item debugging and making a debugging record.
7. System debugging
After the sub-item debugging is completed, carry out system debugging, linkage debugging and trial operation and make records. The installation of other parts of electrical equipment should be carried out strictly according to the drawings.

Reasons why the LED stand light keeps flashing after it is turned on:
1. The lamp beads of the LED bracket lamp do not match the LED driving power supply. The normal current of a single 1W lamp bead is 280-300 mA, and the voltage is 3.0-3.4 volts. If the lamp bead chip is not of sufficient power, it will cause light The light source is flickering. If the current is too high, the lamp beads will turn on and off. In serious cases, the gold wire or copper wire built into the lamp bead will be blown, causing the lamp bead to not light up.
2. It may be that the driving power supply is broken, as long as you replace it with another good driving power supply, it will stop flashing.
3. If the driver has an over-temperature protection function, and the heat dissipation performance of the material of the lamp cannot meet the requirements, the over-temperature protection of the driver will start to work, and the phenomenon will flash and disappear. This will happen if the cooling work is not done well.
4. If the outdoor lamps also flicker on and off, it means that the lamps have entered the water. The result is that it flashes and does not light up. The lamp bead and the driver are broken. If the driver is waterproof, just break the lamp bead and replace the light source.
The above is the specific steps for the installation of the LED bracket light introduced by Xiaobian, and the reason why it keeps flashing after it is turned on. If you have any doubts, please feel free to contact us in time!
Scan the QR code to read on your phone

What are the characteristics of LED roadway lights? Do you know the installation method and precautions? Take a look!
Congratulations to our company for obtaining the Occupational Health and Safety Management System Certification!
contact us

Scan it
Follow us
Copyright © 2021 Nanjing Tansuo Optoelectronics Co., Ltd. All rights reserved Powered by: www.300.cn | 苏ICP备07006102号-1